December 31, 2013

Product Review: Clio Kill Black Waterproof Brush Liner

It has been a very long time since my last make up product review. I bought some items, but I was kinda lazy to write a review about them! Hehe.


Now I review a new baby of me, the Clio Kill Black Waterproof Brush Liner. This eyeliner becomes my favorite for daily use.
So, let's start.

The Packaging:

The box is... I must say... I don't like the color. Really. Black and yellow? It's a big no for me. If I was in a store and see this eyeliner with this box, I wouldn't buy it. Really. But maybe those eyes of Dara from 2ne1 will catch my attention.... 

The packaging of the eyeliner itself is OK. It's black and the logo of Clio and other writings (i never read them) with golden color. It's just OK. Not too long, not too big, it feels so comfortable to be gripped.


The Brush:

It's so damn soft! I am impressed with Clio Kill Black Waterproof Brush Liner. And, I have to make it clear for you, this is brush not a felt tip type. So, it's smooth, soft and it doesn't stimulate your lids' skin. It's perfect. The tip is so thin. It helps you to get an accurate and thin line. 


The Color and Formula:

The color is really black. Now I understand why it is named as Kill Black. I love Clio Kill Black Waterproof Brush Liner so much! The formula is suit for you who have a sensitive lids. Yay!


Waterproof test:

It's waterproof approved! But it's not rubbed-proof. Haha. I mean if you rub them it will fade right away. But it's okay, I never rub my eyes.


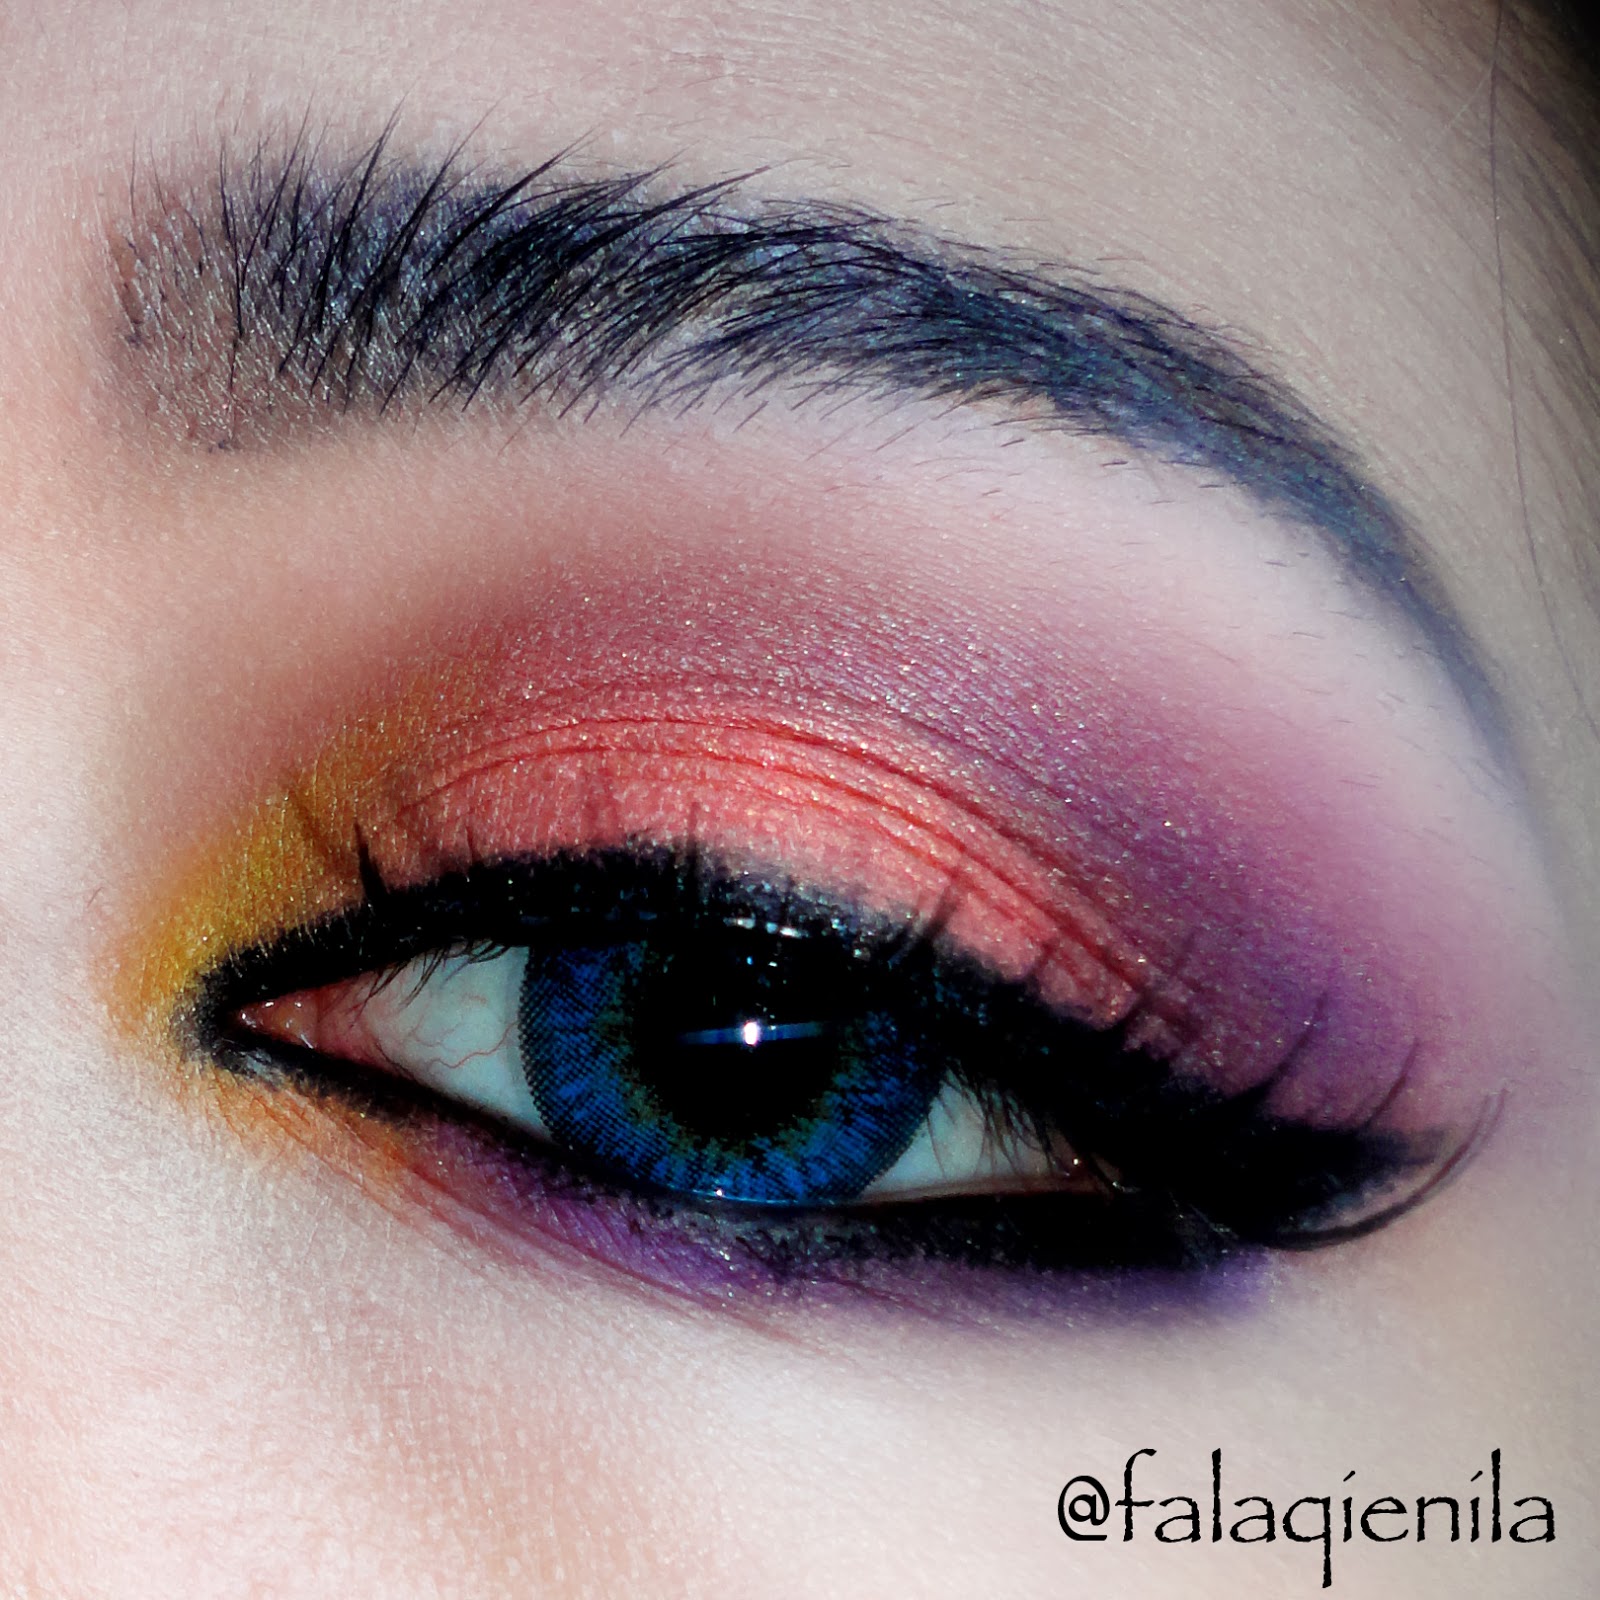
Here's a picture of me wearing Clio Kill Black Waterproof Brush Liner. This eyeliner is my HG for daily use.


So, have you tried Clio Kill Black Waterproof Brush Liner yet? If you have tried this eyeliner, tell me what you think about it :D

Okay, that's it. I hope you find this review helpful :)

Keep in touch with me on

-INSTAGRAM-
-TWITTER-
-FACEBOOK-

Eyeshadow Tips: Find The Right Angle

Jadi, beberapa hari belakangan ini, aku senang membuat beberapa eotd. Dan aku sangat senang dengan komentar teman-teman di komunitas Indonesian Beauty Blogger yang mengapresiasi eotdku :) Terima kasih!!


Beberapa dari kalian request tutorial eotd, tapi maaf aku belum bisa membuat tutorial yang bagus dan informatif. Jadi, sekarang aku akan share tentang tips menggunakan eyeshadow. Tentu saja tips-tips ini bukan berasal dari pengalaman profesional karena aku hanya seorang pecinta makeup, bukan profesional di bidang makeup. Jadi, tips-tips yang akan aku share ini mungkin ada yang dirasa tidak pas atau sangat tidak profesional.

Find the right angle. Ini adalah bagian pertama dari seri eyeshadow tips dalam blog ini. Di sini aku akan share tips yang simple tapi sangat berguna terutama untuk kalian yang baru berkenalan dengan eyeshadow.

Dulu, ketika baru kenalan dengan eyeshadow, aku bingung karena selalu merasa kalau kemiringan sudut luar eyeshadowku itu tidak pas dengan bentuk wajah atau mataku. Setelah beberapa waktu bengong-bengong di depan cermin (haha) aku sadar, kalau rumusnya itu sama saja dengan cara membuat alis. Yepp, dengan bantuan menarik garis dari cuping hidung ke sudut luar mata.


Tentu saja kamu tidak harus menggunakan rumus ini. Tapi dari pengalamanku, rumus ini sangat membantu terutama kalau kamu ingin membuat v-shape eyeshadow. Dengan rumus ini pun, bisa dipastikan kamu akan dapat membuat eyeshadow yang membantu matamu terlihat lebih terangkat :)

Oke, itulah tips pertama untuk seri eyeshadow tips. Semoga membantu ya :)

Di sini aku menggunakan contact lens dari Japan Softlens, Ageha Midnight Black.


softlens
Japan Softlens | Jual Softlens Warna Nyaman Asli Jepang♡

Keep in touch with me on

-INSTAGRAM-
-TWITTER-
-FACEBOOK-

December 26, 2013

Simple Look For New Year

Hallo! Vrolijk Kerstfeest! Merry Christmas, cupcakes!
I know it's kinda late to say it, but I don't write any post yesterday, so, it's okay, yes?
Because it is too late to share a christmas look, then I decide to share a New Year look. This look is not heavy nor festive. I use neutral colors such copper and deep brown to create this look. It is simple, easy yet stunning (no? ok).


It is my first time put a before-after picture here. Hahaha... Well, my bare face is not flawless but I am proud with my face. (walau pun kelihatan kayak orang sakit tapi tetep cinta sama muka asli :P).

And, here's the close up look for the eyes


Simple, right? So you have to wear fake lashes to dramatize your look ;)

If you are not into a colorful look, you can wear these neutral colors. Just remember to wear a shimmer or at least satin finish for the eyeshadow and put fake lashes to your lash line.


Products I used:

MUA Undressed Me Too Palette
Maybelline Gel Eyeliner in Black
Elise Lashes 5118
Itsdiva Lashes (lower lashes)
Maybelline Dream Matte Mousse in Sand Beige
Revlon Photo Ready Concealer in Light
Oriflame Creamy Lipstick in Vintage Rose
Oriflame Beauty Cream Blush

 Aku menggunakan Ageha Lunatia Aqua Blue from Japan Softlens <3

softlens
Japan Softlens | Jual Softlens Warna Nyaman Asli Jepang♡

Keep in touch with me on

-INSTAGRAM-
-TWITTER-
-FACEBOOK-

December 23, 2013

Some Eye Make Up Inspiration II

Aloha girls! Aku kembali lagi nih dengan posting berjudul Some Eye Make Up Isnpirations. Hehe... Ini maksudnya sih untuk share hasil latihan ku memulas dan membaur eyeshadow ;)

Oke deh, kita langsung aja ya lihat-lihat 3 look hasil latihanku minggu lalu.

Look #1

Smokey Eyes dengan menggunakan 3 warna yaitu hitam, silver dan taupe untuk membaurkan warna hitam. Eye make up ini aku sebenarnya adalah submissionku untuk giveaway Sanny yang berakhir beberapa hari lalu.


Look #2

Simple gold look. Di sini aku pakai Maybelline Color Tattoo yang Bronze sebagai base dan eyeshadow dari palette Undressed Me Too. Kayaknya sih, menggunakan Maybelline Color Tattoo yang bronze ini sebagai base untuk warna gold adalah sebuah kesalahan... Warnanya jadi terlalu coklat.


Look #3

Tropical Fruit Look. Aku pakai 5 warna eyeshadow. Pinkish orange, kuning, ungu, coklat dan putih sebagai highlight.


untuk 3 eye make up di atas, aku menggunakan Softlens Ageha seri Lunatia warna hijau dan biru. Aku sering ya kayaknya pakai warna biru pas buat eye make up gini... Karena kok aku merasa si Ageha Lunatia Aqua Blue ini bisa bikin eye make up jadi lebih kece XD
Awww Aku cinta banget deh sama softlens Ageha yang seri Lunatia ini. Warnanya cakep.

Kalian bisa cek reviewku tentang dua softlens ini lho^^. Ageha Lunatia Aqua Blue dan Ageha Lunatia Green.

softlens
Japan Softlens | Jual Softlens Warna Nyaman Asli Jepang♡


softlens
Japan Softlens | Jual Softlens Warna Nyaman Asli Jepang♡

Ada special Discount untuk kamu yang berbelanja Softlens Ageha melalui web.

Discount ongkos kirim sampai Rp15.000
Point belanja sebesar 5% dari total belanja

Ada free gifts juga lho ;)

Keep in touch with me on

-INSTAGRAM-
-TWITTER-
-FACEBOOK-

December 17, 2013

Some Eye Make Up Inspirations

Jadi, akhir-akhir ini aku sering latihan memulas dan membaur eyeshadow. Maksudnya sih biar bisa sekece para make up artist. Jadi dengan semangat membara, aku latihan tiap hari sampai kelopak mataku lecet (ga deng, hiperbolis aja aku :P)

Banyak gagalnya... Haha
Tapi ada tiga nih yang jadi favorite aku :3
Beberapa di antara kalian yang follow aku di instagram dan FB mungkin sudah lihat foto-foto ini. Tapi tetap ya aku share di blog, kan aku blogger... :P

Look #1

Pinkish Orange


Look #2
Blue Dendrobium Inspired

I recreate my previous work. And I kinda like the result. Yippie!


Look #3
Candy Colored Eyes.

I like these colors (teal, purple and pink)!


Okay, sekian hasil latihanku. Memang tidak sempurna, tapi aku pribadi merasa hasil bauranku lebih baik daripada dulu... Hehe... 

Untuk ketiga look ini, aku menggunakan 2 softlens Ageha Lunatia dari Japan Softlens, Green dan Aqua Blue.

softlens
Japan Softlens | Jual Softlens Warna Nyaman Asli Jepang♡


softlens
Japan Softlens | Jual Softlens Warna Nyaman Asli Jepang♡

Ada special Discount untuk kamu yang berbelanja Softlens Ageha melalui web.

Discount ongkos kirim sampai Rp15.000
Point belanja sebesar 5% dari total belanja

Dapatkan juga free giftnya

Order 1 Ageha Softlens free 1 pulpen lipstick
Order 2 Ageha Softlens free 1 lipgloss seharga Rp98.000!
Order 3 Ageha Softlens free 1 eyelashes 4minutes seharga Rp148.000!
Order 5 Ageha Softlens free 1 KARA eyelashes seharga Rp168.000 (termasuk glue dan vitamin bulu mata).

Keep in touch with me on

-INSTAGRAM-
-TWITTER-
-FACEBOOK-

December 13, 2013

Product Review: Ageha Lunatia Green (Sponsored)

Hi, sweets!
I am back with my Ageha softlens review. My Ageha softlens of the month is Ageha Lunatia in Green. Green! Green! Never wear a green softlens before. Hope it looks good on my eyes and face^^

The packaging of this softlens is same with other Ageha softlens. You can check my review about Ageha Super Big in Brown or Ageha Lunatia in Aqua Blue.

I will not write a review about its comfort. You can read about its comfort in my previous review about Ageha Lunatian in Aqua Blue^^

FYI, Ageha Lunatia Serie is my favorite! Because it has beautiful 3 tones colors, with a perfect size and curve for me. So it feels soooo comfortable on my eyes. And the most important is, this softlens never moves when i blink. It really fits my eyes.

Okay, let's check how Ageha Lunatia Green appears on my eyes.

With and without Ageha Lunatia Green

With Ageha Lunatia Green
Under room light


With flash


Wow, the colors appear so well on my black eyes XD
I love it.
But if you ask me if I would wear this softlens for daily use, my answer would be NO. I prefer a neutral color like brown and honey for my daily softlens :3

But this softlens is a best choice for you who like to be different and stylish and have a warm skin tone ;)

IDR 182.000
Power: 0 - -4
Available at JapanSoftlens
Worldwide Shipping ♡

softlens
Japan Softlens | Jual Softlens Warna Nyaman Asli Jepang♡

The Hunger Games: Catching Fire Mega Collab (District 2: Masonry)

Aloha, beauties!
Jadi beberapa waktu lalu, 12 orang beauty blogger berkumpul untuk bergabung dalam sebuah mega collab dengan tema Hunger Games! Lagi hot kan ya Hunger Games ini XD
12 orang blogger menginterpretasikan 12 distrik yang ada dalam kisah Hunger Games. Awesome!
Siapa aja sih 12 blogger tersebut? 

Sanny dari District 1 - Luxury 
Nila dari District 2 - Masonry
Iva dari District 3 - Technology
Mukti dari District 4 - Fishing
Ellen dari District 5 - Power
Vindy dari District 6 - Transportation
Gita dari District 7 - Lumber
Reezki dari District 8 - Textile
Devy dari District 9 - Grain
Riri dari District 10 - Livestock
Irene dari District 11 - Agriculture
Ayes dari District 12 - Mining


Kece-kece kan semuanya...? XD

Nah, kalau yang aku gini nih penampakannya... 


Aku googling tentang masonry dan yang keluar tembok bata semua -___-;; Jadi masonry ini berkenaan dengan tembok dan finishing bangunan. Oalah, macho banget temanya. Haha.
Jadi beginilah, aku buat sebagian mukaku jadi tembok bata dan sebagian lain (berusaha) cantik dan kuat.


Yah, begitulah, kawan-kawan, hasil interpretasi tentang masonry ini... ;)

November 23, 2013

DIY: Homemade Eyeshadow Base

I do not have any eye primer or eyeshadow base! Kapan pun aku mau atau berencana membeli benda satu ini, selalu tidak kesampaian. Misalnya, aku malah membeli hal lain (biasanya lipstick) atau aku hanya tiba-tiba sekedar hilang minat saja. Lalu kemudian aku pikir lagi, kenapa tidak kubuat sendiri saja... Awalnya aku mencoba mencampur concealer dengan foundation/bb cream tapi hasil butut parah. Lalu beberapa minggu belakangan ini, aku mencoba paduan dua benda yang pasti kamu punya di rumah.

Body Butter (I use Olive Body Butter from Mustika Ratu)
Foundation (I use Revlon whipped foundation)
Tea Spoon
Jar (with lid will be better and safer)


So easy right? Gampang kan? Hasilnya juga oke lho... Kamu mendapatkan hasil sapuan eyeshadow yang lebih merata dan mudah diblend. Kelopak mata pun jadi tidak mudah berminyak, dan tidak timbul garis-garis berminyak.

Ini dia hasil dari homemade eyeshadow base ini. Warna coklat yang sama sekali ga terlihat di kulitku kalau ga pakai eyeshadow base jadi terlihat banget. Begitu juga dengan hitam. Untuk warna lain yang aslinya memang pigmented, hasilnya jadi merata dan tahan lama.

Left: without homemade eyeshadow base
Right: with homemade eyeshadow base
Tips:

Gunakan body butter, jangan lotion. Karena lotion tidak cepat kering seperti body butter.
Tunggu homemade eyeshadow base ini mengering dulu sebelum kamu mengaplikasikan eyeshadow. Eyeshadow base ini tidak butuh waktu lama untuk kering kok. Hanya beberapa detik saja.
Kualitas foundation dan body butter mempengaruhi kualitas dari eyeshadow base ini.

Keep in touch with me on

-INSTAGRAM-
-TWITTER-
-FACEBOOK-

November 19, 2013

Mermaid

Ahooyyy!
Aku cuma mau share 2 mermaid look-ku. Jadi post kali ini hanya akan berisi satu alinea dan keterangan gambar, selebihnya adalah foto. Hehehe... Oke deh, silahkan dilihat-lihat dan kalau bisa dan berkenan berikan komentar ya tentang dua look ini... Sejujurnya aku ga puas sama dua-duanya sih, tapi tetap aku share karena aku berharap dari sharing ini aku bisa dapat masukkan dari teman-teman semua :*

Ini adalah mermaid look pertamaku


Ini yang kedua


Aku pakai si softlens biru, Lunatia in Aqua Blue dari Japan Softlens :3


November 18, 2013

MUC: ReCreate Riri

Aloha Candies!
Aku ikutan MUC lho! (akhirnya, ikutan MUC lagi setelah puasa berbulan-bulan...Haha). MUC yang aku ikuti kali ini adalah punya Riyanti Teresa. Kalau kamu mau ikutan juga kamu bisa lihat apa saja syarat dan ketentuannya di sini. Tapi hari ini batas terakhir pengumpulan lho... Hehehe... Tapi masih ada beberapa jam lagi sebelum hari ini berakhir kan? Jadi ayo cepat ceki-ceki blog Riri untuk cari-cari look mana yang akan kamu recreate.

Aku recreate look Riri yang Crestfallen Beauty. Look Riri ini merupakan look favorite ku, karena walau murung kok tapi Riri tetap kawaii... <3 Hehehe


Ini foto aslinya, yang di banner aku flip demi keseimbangan gambar... Heheh
Flower Crown buatanku aneh banget... hahha.. kekecilan >_<
Dan lagi, itu air mata berliannya terlalu tebel glitternya...


Recreating Riri's Look satu ini memang tidak sempurna >_< Tapi wish me luck yah!

November 17, 2013

Product Review: MakeOver Creamy Lust Lipstick in Clover Haze

Hello Cupcakes! I'm back with another review of a lipstick (I looove lipstick so muchos!). If you are looking for a good yet affordable cream lipstick and you have a warm skin tone, maybe this MakeOver Creamy Lust Lipstick in Clover Haze will catch your intention. If you are not, keep reading my review please, because this lipstick is really good!

What is MakeOver anyway?
If you are a make up junkie and an Indonesian, you have to know and try this awesome local brand. Seriuosly. Because.... It's Indonesian local cosmetics brand which has a good to awesome quality.

Honestly, I don't really know about this brand -___-a I will update this review as I get a new info about MakeOver.

The Packaging

The packaging is quite nice, I think. It comes with black plastic color (all MakeOver product comes with this color) with the logo of MakeOver. I kinda like the logo, it's simple yet nice.

<3 It's not fragile <3


The Texture and Formula

It's creamy, but not too creamy. Sometimes there is a creamy lipstick which is too creamy and it becomes a mess once I apply it -__-. I love its texture, and it moisturizes my lips. I ever wore it without applying lip balm first, but it was okay!

It starts fading after 4 hours and after drinking, eating, etc. But that's not a big problem.  


It's just sooooooo pigmented. Look at the picture below. I only swatched it a layer but the color already appear beautifully. 


The Price

MakeOver Creamy Lust Lipstick costs about 70K IDR. Quite affordable, I think.


Variant


It has 12 variant of colors. Mine is Clover Haze the number 60. I don't know all name of the color because the catalogue I got only tell the number... >_< Not pretty. MakeOver should put the name of the colors.

Okay, that's all my review about MakeOver Creamy Lust Lipstick in Clover Haze. Have you ever tried this lipstick? Tell me what you think about it. I'd love to know <3

Extra

Aku dapat lipstick ini ketika menghadiri kontes make up yang diadakan oleh MakeOver di Mall Taman Anggrek. Tema kontes tersebut adalah Be Creative with MakeOver Eyeliner.

Eyeliner pensil dari MakeOver itu creamy dan warnanya sangat pekat. Sekali toreh, warna-warna cantik langsung terlihat. Tekstur creamynya juga sangat lembut sehingga bisa dipastikan kamu tidak melukai kulit di dekat matamu ketika mengaplikasikan eyeliner ini.

Itu review singkatku tentang eyeliner pensil dari MakeOver.

Apakah aku punya eyeliner pensil MakeOver? Aku tidak punya. Karena aku tidak suka sama sekali dengan eyeliner pensil yang harus diraut. Hehe...

Kembali ke event kontes make up MakeOver. Benar-benar deh, aku tidak terbiasa mengaplikasikan make up di public sphere. Haha... Benar-benar bikin nervous dan my hand was so cold.

Aku tidak menang di kontes tersebut. Tapi pengalamannya sangat berharga. Semoga lain kali kalau aku ada kesempatan untuk mengikuti kontes lagi, aku lebih bisa mengendalikan diriku. Haha...

Jadi siapa yang menang di kontes tersebut? Mereka adalah Sha Aulia, Iva dan Nita. Mereka bener-bener keren deh makeupnya.


Sha, Me, Iva and Endi


Related Posts Plugin for WordPress, Blogger...